Showing posts with label подплата. Show all posts

Friday, February 6, 2026

Brick Sinclair Journey Jacket for Gaby

The piece of brick-colored fleece I bought last year turned out to be large enough for not one, but two raglan jackets. I didn't see a need to search for a different pattern. While brick is my favorite color, I knew I didn't need two identical jackets for myself, even if they were different cuts. The simpler and more logical decision was to use the same pattern to make a second jacket for Gaby. 

Size: Petite (152-160 cm) 4 S with added 2.5 cm to the sleeve length
Fabric: polar fleece; lining - polyester jersey
Time to make: 10 days

A small difference from my own jacket is that I didn't add the extra 1 cm to the upper part of the sleeve. Gaby is a bit slimmer than I am and prefers tailored clothes, so the original size should fit her well. Otherwise, the jacket is a complete repetition of my own. 

I made the same gathered tall collar, leaving it soft and pliable without any stabilizer. If I ever make a jacket out of this type of fleece again, I might try a very light knit interfacing on the collar, hem, and cuffs; I feel they need just a little more structure. 

The lining for Gaby’s jacket is a polyester knit from my stash, this time in black. Apart from adding an extra layer of warmth and hiding the raw seams, the lining makes the jacket much more wearable. This fleece is quite 'sticky,' and trying to pull the jacket on over other clothes without a lining was problematic.

I attached the lining by leaving a large opening at the bottom and a smaller opening in one of the sleeves. This made it easy to pull the jacket right-side out through the bottom gap and then close that gap through the sleeve. I closed the final opening manually with a slip stitch, which is invisible but easily accessible if repairs are ever needed.


This time, I also remembered to secure the lining away from the zipper—I wish I had done that for mine! I’m not going back to fix my own, but I'll remember this for the future to avoid catching the fabric in the zipper teeth. 

This is another project for my "Make Nine" effort this year to sew from my stash: fabric 12 from the list, plus the black lining I bought three years ago for another fleece jacket. So far so good on the stash reduction!  :)


Friday, January 30, 2026

Brick Sinclair Journey Jacket for Myself

Although I haven't posted about sewing for a while, I've been very active this month,  I just need to catch up on photographing everything I’ve created.

Here is one of them -  a fully lined Sinclair Journey Raglan Jacket and my second Make Nine for 2026 - this is fabric 12.

I had over 2 m of thin polar fleece in this gorgeous brick shade that I picked up last year. The moment I saw it I knew I had to have it, as this is my most favourite color and, if I do say so myself, it’s very complementary to my complexion (which explains why my wardrobe is full of it!)

The pattern I chose for the jacket is a true-and-tried raglan pattern, that I've already made three times - twice for Gaby and once for myself. Although the Sinclair Journey pattern has several versions, I chose to make a complete repeat of the Andean jacket I made for myself over a year ago. It is my go-to zip-up, I wear it all the time and I've been planning to make another one out of polar fleece for ages, so the choice of the pattern was the easiest part. 

The mods I made to the pattern are more or less identical to that for my Andean jacket. I added 2.5 cm to the length of the sleeve and I also added 1 cm to the width of the sleeve. I find Sinclair patterns a bit too snug, I prefer my jackets to have some ease, as I wear them over blouses and sweaters. 


Size: Petite (152-160 cm) 4 S with added 2.5 cm to the sleeve length
Fabric: polar fleece; lining - polyester jersey
Time to make: 10 days
 

My major modification is the collar, which I designed based on the half-hood, provided in the pattern. As my polar fleece is very pliable and thin, the collar does not stand up firm as in my previous jacket, but I didn't want to risk adding fusible to it and ruining its softness.  

The jacket closes with a zipper up to the end of the collar, which can be worn as a shawl / turtleneck collar, providing protection for the neck in cold weather. 

I opted for welt pockets again, securing the inner pocket bags to the hem and zipper for stability.

As this jacket is a part of my Make Nine effort to use up my fabric stash, I lined the jacket with a navy blue polyester jersey I already had. In combination with the blue blouse, blue jeans and blue hat of my present outfit, all self- made, I find the blue lining a happy serendipity, as it compliments the brick color of the fleece perfectly, adding depth and contrast. 

Despite the lightweight fleece fabric, the lining makes this jacket surprisingly warm. It’s the perfect mid-layer for winter or a standalone second layer for spring and autumn. I am thrilled with how it turned out!

Bonus: Because I’m a very economical cutter, I managed to squeeze an almost identical jacket for Gaby out of the remaining fabric. Stay tuned for more on that soon! 


Saturday, July 5, 2025

Beige Dress for Gaby

Last year I bought a large piece of viscose and made a Rhapsody for Gaby out of it. I had a fairly big remnant - probably half of the fabric, so this year I decided to use it to make a summer dress for Gaby.

I am modeling the dress, but it is supposed to fit Gaby, who is taller and a bit more broad-shouldered than me.

The pattern is a mesh-up of three dresses and it took me quite a while finally to cut it. The skirt is a slightly widened skirt from the Roliz dress by Vikisews. I love my Roliz and my only regret is that I didn't make the skirt a bit wider, as I had plenty of its gorgeous fabric.

The bodice is again Burda #104 02/2011 dress, but only up to the armholes. The back is cut straight and flat, and the front continues into Bailen dress by Pauline Alice, with wider straps, as I was aiming at strap width that could cover the bra straps underneath. The dress closes with a zipper on the side.


Pattern: Bailѐn Top by Pauline Alice, free pattern, Roliz by  VikiSews, Burda #104 02/2011 dress
Size: 34 
Fabric: 100% viscose for the outer dress, polyester for the lining
Time to make: 3 days
 

The dress is fully lined, as all of my woven fabric dresses lately, with simple beige lining fabric for the bodice and smooth poly-acetate lining for the skirt.


Sunday, January 7, 2024

Gaby's Andean Jacket

Gaby was with us for almost two weeks and I wanted to use the time and sew something for her, that I could measure directly on her and she could take with herself when leaving back for Vienna. She immediately chose an Andean jacket for herself. 

Originally I had about 2 m of the fabric, in two 1 m cuts and I had quite significant leftovers after I made my own jacket. It was clear that the fabric itself wouldn't suffice, so I went downtown and found some suitable complimentary knit fabric, and also more of the same purple polyester lining, which I liked so much for my jacket.

As Gaby is taller than me, I made her jacket a bit longer than mine - as much as the fabric allowed and I also added length to the sleeves. Cutting the pieces, matching the stripes, fitting everything within limited fabric, with some fabric defects at that, which I had to work around, was one of the biggest challenges I have faced sewing. But I love these Tetris games with fabric, so I might say I had fun with this project.

 
Size: Regular , shortened -4 cm, 4 S with added 2.5 cm to the sleeve length
Fabric: French Terry / double knit; lining - polyester jersey
Time to make: 6 days


The jacket is almost identical to mine, with the exception of the back, which has a dark navy insertion. I actually like that solid piece a lot and find it more a feature than a bug of the jacket. Some other compromises had to me made too, but they are not significant and noticeable - the collar is not a single piece, like in my jacket, but is made of one front layer and two pieces, making the back layer. The bottom band is also made out of two pieces - the outer one is striped, the inner one is solid color.

Still, despite the patched up work here and there, I think it turned out perfect and hope she will enjoy wearing it.


Tuesday, December 12, 2023

Andean Jacket

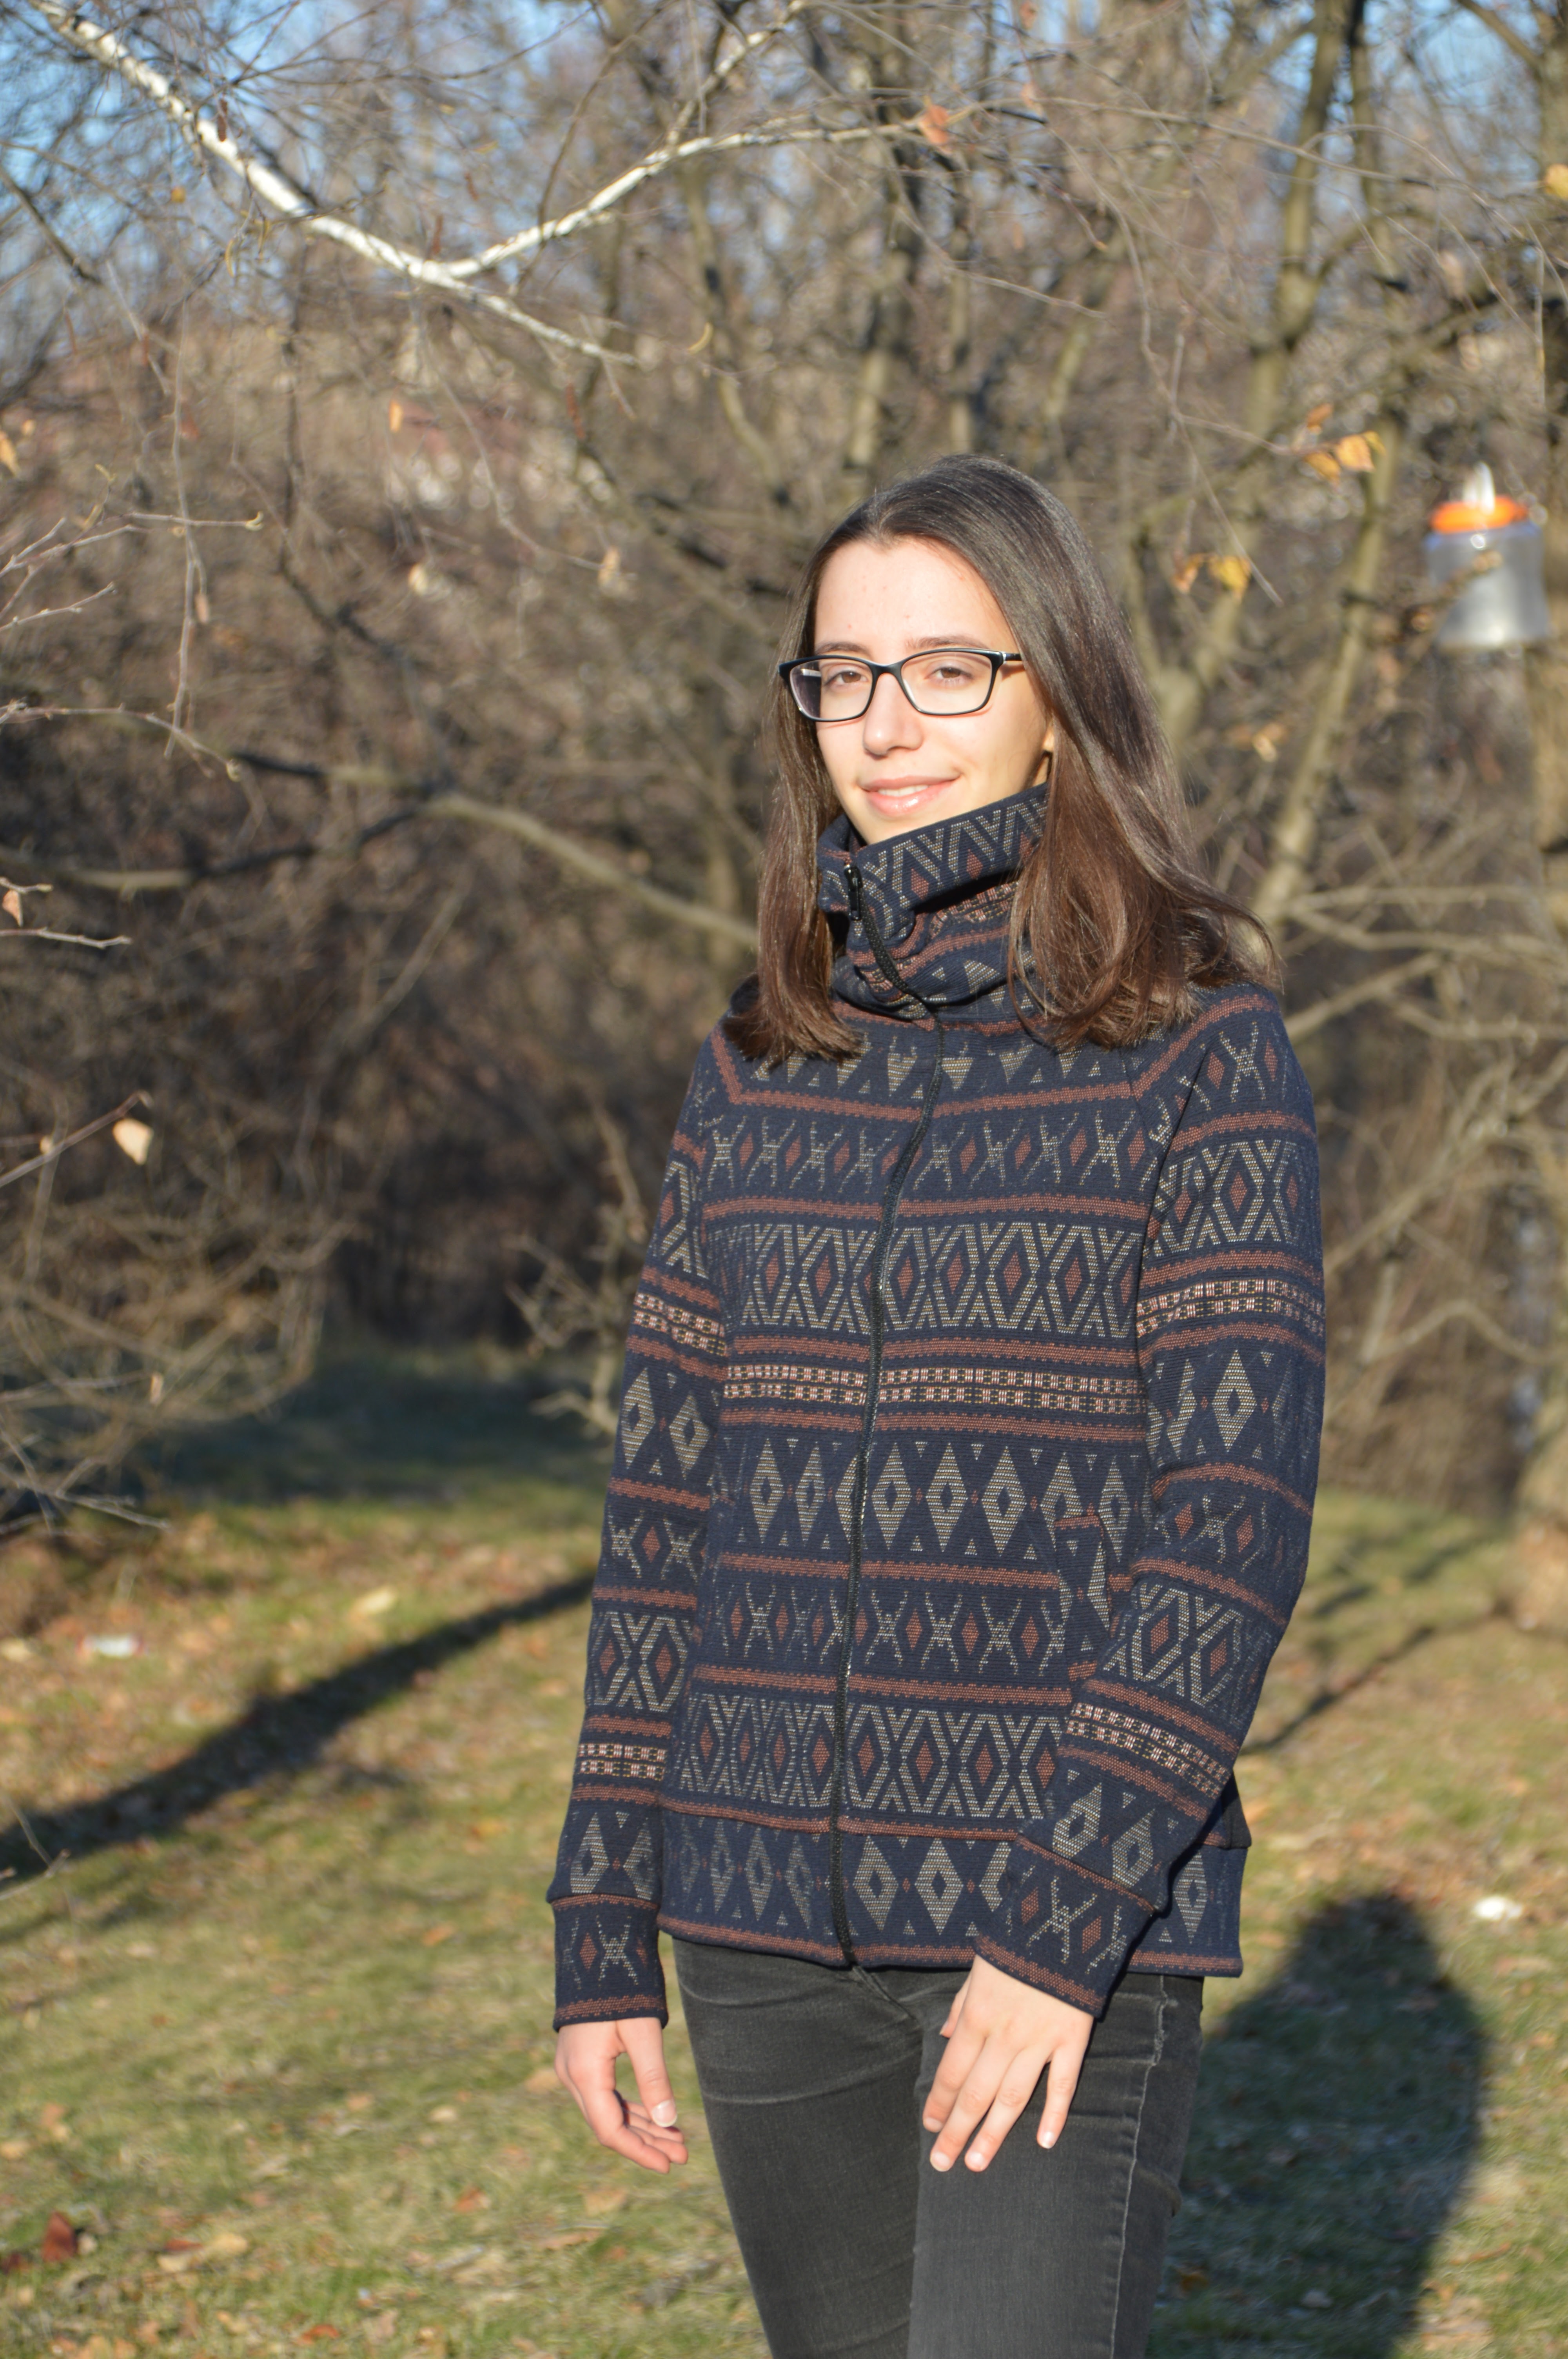
My latest and most favourite make - a lined zipper jacket. The outer fabric is one of the fabrics I was given by a friend a couple of years ago, when she decided to quit sewing and destashed. I fell immediately in love with its pattern and was saving it for something special. A few times I was just about to cut into it - for a long skirt or a short poncho, but luckily, abandoned the idea. 

I say luckily, as I think this zipper jacket is the best use for this fabric. The pattern is Sinclair Journey, which I bought recently for another project I am making for Gaby. I was half way through with Gaby's jacket, when I hit a rock and decided to step a bit aside and make another version of the pattern for myself.

As it happened, I had the perfect fabric for the lining and the perfect zipper, even its length was the exact one I needed - it seemed the stars had aligned for this project.

The version of the jacket I used is View B - the one with zippered pockets, but I decided to make mine one-side welt pockets (my first!). The pattern pockets are designed to stay loose, but experience has shown that such pockets are not very practical, so I designed my own pockets to be attached to the zipper opening and the bottom band.

My most favourite part of jacket is the collar. Here again I took the View B half-hood, added 5 cm to its height, straightened the back seam, so that I could make it seamless and then extended the front of the collar, drawing a line at a right angle to the back - thus I added 8 cm width to the front part of the collar. The additional width goes into the folds and makes the collar one of main features of the jacket.

Size: Petite (152-160 cm) 4 S with added 2.5 cm to the sleeve length
Fabric: French Terry / double knit; lining - polyester jersey
Time to make: 5 days

This is my third lined hoodie and the first time I added the lining correctly and easily. I always knew there must be a correct way to assemble the outer part and the lining, and I think I finally found it after watching a video by Dasha Sineva, where she showed her process of sewing a lined jacket. The simple secret is to leave two openings - one big opening at the bottom back and one in one of the sleeves.

I had 2.15 m of this fabric in two pieces of about 1 m each and I have some big scraps left, which I intend to combine with some other knit fabric and make another lined jacket. Husband wants it for himself, as he also fell in love with the striped geometric pattern, but we'll see. I'm not sure the pieces are big enough for a grown man like him.

It's a pity it is already winter here and sunny days like yesterday, when we took these pictures, are a rarity, but come spring I intend to wear this jacket intensely. I was down to the fabric store today, bought the missing notions and tonight I'll back to Gaby's jacket, hopefully it will be no less successful than mine.

A short note on my preliminary work - when I bough the pattern, I determined Gaby's size as 4 S petite, printed the pattern and made a muslin out of an old bed sheet. I know you aren't supposed to make test clothes for knit garments out of weaved fabric, but I thought a muslin would still give me some idea. Well, I was wrong. The muslin felt too small and tight and made me go up a size and up a height. Once I cut Gaby's jacket out of her fleece fabric, I found it too wide, so I had to cut it back to 4 S and I knew that my initial sizing had been right. So, all that work to print two sizes and sew two muslins had been absolutely in vain. Now I know a muslin really works only when you are using a similar fabric, no going around that :(

And one further note: raglans and patterned fabric. It took me probably three days of measuring and thinking, until I cut the fabric. Initially I had drawn the pattern pieces as economically as possible and just when I was about to start cutting, it occurred to me, that the raglan connections would be clearly visible at the front and thus the pattern pieces of the body had to be aligned with the sleeves not at the bottom, but at the sleeve opening. I know that is probably pretty obvious for experienced seamstresses, but it was a revelation to me and it might help somebody (or my future self), when using such patterned fabrics and raglans. As a whole, it did take a lot of planning around the fabric, but i am really happy with the placement of the pattern :)


Saturday, February 18, 2023

Men's Lined Hoodie

I made a new hoodie for my husband. The pattern is very similar to that of my own hoodie out of the same fabric - front zipper, big three-part hood, split kangaroo pockets, fully lined.


The outer fabric is a double knit in large houndstooth design in black and grey. I was gifted this fabric a couple of years ago and after I made my hoodie, which is a staple in my hiking wardrobe, I've been contemplating a similar one for husband as well. Recently, after making him a Burda longsleeve out of a nice viscose knit, I noticed that my pattern contained actually two versions - the one I made and a second version with a hood and a kangaroo pocket. And the hood was exactly the style I was looking for - with raised neckline and a central insertion.

The original pattern is actually a blouse, but there's nothing easier than adding a zipper in the center and turning a blouse into a zippered anorak. Because my outer fabric was kind of thin and prone to sticking to other fabrics, I opted for a full lining again. I've been into high quality heavy viscose knits lately, so we chose this gorgeous bright orange viscose to liven up and complement the dark color of the outer fabric.

As far as sizing - my husband is size 48 according to Burda size tables, and the long-sleeve from this pattern in size 48 fits him perfectly. For the hoodie I went a size and a half up - that is I chose size 50, but added additionally a bit of width to the body, to take into account, that this is a lined hoodie, to be worn over other blouses.


Size: 50 with with added length
Fabric: double knit; cotton viscose knit; rib knit
Time to make: two weeks

The hood is deep and wide enough, without being too roomy, I think it has a good balance.

The pockets are also deep and lined as well. I added rib knit at the pocket openings for stability. 

I also tried to do pattern matching, where possible, without being too obsessive.

We still haven't worn our similar hoodies in the mountains, I wonder how it would feel - cute or ridiculous :)