Showing posts with label DIY. Show all posts

Saturday, December 14, 2019

Crochet Ball Necklaces


It all started with an idea for a small present for one of Gaby's sweet friends, who always brings me fresh rosemary from her family garden. I had one cake of YarnArt Violet 100% mercerized cotton in bright yellow, a remnant from a yellow sweater I knitted years ago. And I also have various wooden beads I´ve bought over the years for craft projects. On Wednesday after my Spanish classes I passed through one of the craft shops downtown and bought two metal wire circles for necklaces and two waxed cotton strings with clasps.


First I crocheted around two beads with the yellow cotton yarn, added three more bare wooden beads and voilá - the necklace was done. But as easy as it sounds, don't get me wrong - I'm so clumsy and inexperienced with the crochet hook, especially with such a small hook and thin thread, that crocheting around each bead took me probably half an hour each and cost me at least one aching finger :)))


However, I was bitten by the crafting bug and I spent the next day dyeing small amounts of the yellow yarn with different concentrations of blue cotton dye to get a gradient. Thus the second necklace was born, with crocheted balls for complementing earrings, which I intend to finish once I buy the necessary hardware. This necklace is for Gaby.


But how could I not make something for myself! This one is a long pendant, hanging on a waxed cotton string, with complementing earrings, of course.


And because husband complained that the colors I was using were too dull, something bright and cheery - reds, oranges, peaches and yellows on a waxed string:


I have plenty of dyed cotton yarn and ideas for necklaces and earrings, so there'll be at least a couple more before I exhaust my inspiration.

Tuesday, December 11, 2018

DIY Christmas Tree Ornaments


Inspired by a few youtube DIY video tutorials and by the fact that husband bought a glue gun, I made a dozen (plus one) Christmas tree ornaments for the University Christmas market. It's an annual charity event for the Wild Animals foundation and ... an occasion for me to play with the new glue gun.


I collected the pine cones on Vitosha and Plana during our last months hikes and all the other bits and pieces came from my haberdashery stash, gathered through the years of crafting. It's so nice to be able to use up some of this stash, finally :)


All of the 13 ornaments. I like them and I do hope Gaby's colleagues will like them too and will take them home, contributing to the charity event.


I'm even considering making a bunch of these for our Christmas tree decoration too, but not right now. Maybe next week, or better - next year. A dozen was plenty :)

Monday, July 30, 2018

New Bird Feeder


Husband built a new bird feeder for our small feathered friends and it's a smashing success. I truly admire his skill and perseverance, given the fairly primitive tools for wood processing we have at home. The feeder was made of 1 yard wood planks bought from Mr.Bricolage and a piece of flooring we had at home.

The birds that frequent us are mostly great tits (Parus major) and a few blue tits (Cyanistes caeruleus). In winter we get finches, but in the summer it's only the tits.

Some of them nib at the seeds right inside the feeder, sheltered from the rain,


but most grab a seed and fly to the nearby trees to eat it in private.

Monday, December 25, 2017

I Built a Radio


Sometime ago the wonderful carol from carolbaby.com posted about her first soldering project and I thought it such a splendid idea for me to try. The funny thing is that my husband is a die-hard DIY computer and electronics enthusiast and we have all one needs to do some amateur soldering, but I had never thought of it as something I might be good at or find interesting. Now I wonder how I could have been such a blinkered horse, soldering turned out easy and FUN!
For my first project husband recommended a ready-to-make kit, including the board, the required elements, a case and antenna - the final product looks like the real thing. And it works - I couldn't believe it when I put in the batteries and it went live :) It even has an alarm clock, which turns on the radio and a jack for earphones. I'm ready for more soldering!!!

: Мy work station

: First I soldered the low elements - resistors and capacitors

: The beds for the ICs were tricky


: Connecting the screen to the board

 : Adding the speaker

: These neat drops of solder tin and flux!

: And in the end everything went into the neat case. It has a built-in speaker or one can listen to it using earphones. I plan to listen to MY radio while working in the kitchen.

Thursday, June 29, 2017

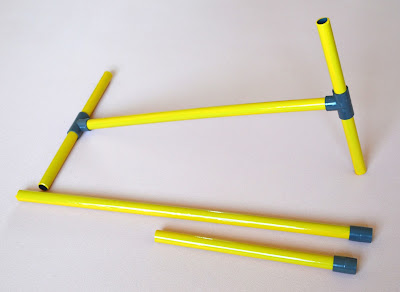
My DIY Niddy-Noddy


I made my own cheap and easy to make and use niddy-noddy. All credit for the idea goes to Rebeca from ChemKnits and her video tutorial.


My materials:
  • 2 m PVC water pipe, f 20 mm
  • 2 T-shaped pieces, f 20 mm
  • 2 joining pieces, f 20 mm
  • 2 m heat-shrink tube, f 25 mm


I bought my water pipe and joining pieces from our local shop for water piping and staff and it came in one piece and in an ugly industrial grey color. Also, the joining pieces were a bit loose as these are supposed to be glued to the pipe and I wanted my niddy-noddy to be easy to assemble and re-assemble. So I also ordered the heat-shrink tube in this bright yellow color on e-bay. It made the device much more user-friendly and gave the additional thickness the piping parts needed to fit snugly into the joining parts.


I cut my tube into 4 x 15 cm pcs, 1 x 30 cm pc., 1 x 50 cm pc. and 1 x 60 cm pc. Thus I can assemble the niddy-noddy into various lengths. So far I've used it twice and I found the 50 cm length most comfortable for me - it produces a skein of about 1 m length. Rebeca has also a very useful video on how to use the niddy-noddy. The principle is - the yarn has to be on the outside of the device and try not to cross the thread. It's very easy to remove the skein once you've wound the yarn - just disassemble the niddy-noddy.
So happy with my new yellow toy!


Sunday, March 19, 2017

Striped Sock Yarn


The second 50 g of the white Alize Superwash, which I dyed, using the same method I described in my previous post and five wool dyes - red, yellow, blue, violet and purple. This time I tried to dye the yarn in sections, aiming at stripes for socks my size.


You might have already guessed that I'm a fan of uneven, mixed, impressionist colors. I like harmony in asymmetry and irregularity.


I started the sock to see how the stripes would come out and I'm loving it. But first I have to finish the socks I'm knitting out of the green sock yarn.


Monday, January 25, 2016

Colorful Envelopes


Did you know you could make colorful envelopes with paper napkins and some cling film (plastic wrap)? I didn't, until I came upon this youtube video. It was Sunday yesterday and -14C or so in Sofia, so I didn't feel like going out in search of open stationary shops, but I had to try it ... like right now. So I printed several envelope templates on plain white printing paper, dug out a handful of paper napkins and got to work.


When Gaby was little she used to collect colorful paper napkins - most small girls seem to be into collecting. And she still has the four boxes of napkins she gathered through buying and exchanging over the years - so I had plenty of material to choose from.


For one of my envelopes I also used color paper - this one would be perfect for a valentine card.
Now, the process - print and cut the envelope or unglue and open the ready-made envelope. Iron it. If you are using luxury napkins like mine, separate the upper printed layer from the other two white layers and iron the printed layer. Use hot iron without steam. Cut a piece of cling film and place it on the envelope. Place the napkin on top. Iron carefully and slowly. The cling film will melt and glue the napkin to the paper envelope. It's that simple.


Here's how it looks like after the ironing. Cut the excess napkin and cling film and the envelope is ready.


Glue the sides to make it into an envelope and place a greeting card or whatever inside.

Here's another one:


I made several. The one with the blue flower in the middle was made from a simple one-layer kitchen napkin, that works fine too.

This is my favourite, it is the first one I made, using the only factory-made white envelope I had at home.


And these two I made today. When hubby said he had to go to the local post office this morning I couldn't help it but ask him to bring me some white envelopes. Pity I didn't know this trick before Christmas, all of our friends and relatives would have received their Christmas cards in modified themed envelopes :)))