Sunday, March 31, 2013

Project Bag


I had been planning a project bag for some time and today I finally made one, 
following the excellent instructions at Noodlehead.


 The bag is 35 x 30 cm, cotton fabric inside and outside, no fusing, jeans bottom.


It already contains this Drops dress WIP from last summer with my every intention to frog it and turn the yarn into something else. Last night I browsed thoroughly through Gail's tutorial notes on Miette. Turns out she is the same bust size as me and made her cardigan with the same modifications I plan so far, so if my gauge is right I'll just follow in her steps. But even if I have to recalculate here and there, the charts, stitch count spreadsheet and general notes will be of tremendous help. Thank you, Gail !!!


Saturday, March 30, 2013

Easter Egg Tree


Super easy and fun decoration for Easter (which in Bulgaria this year, being Orthodox Christians, we'll celebrate not tomorrow, but on May 5th. I think having different dates for Western and Eastern Easter is silly, but I suppose some more centuries will have to pass for the clergy to figure out the issue).


I've used again the same scrap yarns and cushion filling as for the mitered square cushions.
Yarn: YarnArt Jeans, 50 % cotton, 50% acrylic, hook 2.5 mm (C).


After a dozen of tries I found that I like my Easter Egg best as follows:


A recipe for an Easter Egg:

 1 rnd: Make a magic loop, 6 sc in loop, sl st, pull the thread to close the loop = 6 sc
 2 rnd: 1 ch, 2 sc in each sc, sl st  = 12 sc
 3 rnd: 1 ch, (1 sc in first sc, 2 sc in next), repeat to end of rnd, sl st = 18 sc
 4 rnd: 1 ch, 1 sc in each sc = 18 sc
 5 rnd: 1 ch, (1 sc in first two sc, 2 sc in next), repeat to end of rnd, sl st = 24 sc
 6 rnd: 1 ch,  1 sc in each sc = 24 sc
 7 rnd: 1 ch,  1 sc in each sc = 24 sc
 6 rnd: 1 ch, (1 sc in first three sc, 2 sc in next), repeat to end of rnd, sl st = 30 sc
 8 rnd: 1 ch,  1 sc in each sc = 30 sc
 9 rnd: 1 ch,  1 sc in each sc = 30 sc
10 rnd: 1 ch,  1 sc in each sc = 30 sc
11 rnd: 1 ch,  1 sc in each sc = 30 sc


12 rnd: 1 ch, (1 sc in first three sc, 2 sc tog), repeat to end of rnd, sl st = 24 sc
13 rnd: 1 ch,  1 sc in each sc = 24 sc 
14 rnd: 1 ch, (1 sc in first two sc, 2 sc tog), repeat to end of rnd, sl st = 18 sc
15 rnd: 1 ch, 1 sc in each sc = 18 sc
16 rnd: 1 ch, (1 sc in first sc, 2 sc tog), repeat to end of rnd, sl st = 12 sc
Fill the egg with suitable toy filling.
17 rnd: 1 ch, (2 sc tog), repeat to end of rnd, sl st = 6 sc
Pass thread through the 6 sc  and close slightly the gap, weave in ends.

Sunday, March 24, 2013

The Sara Kelly Jacket


I should probably start with the fact that I don't like shopping at the mall and prefer ordering online. With the accompanying risk that the thing the courier brings may not fit. So, last week thus arrived the Sara Kelly jacket in a gorgeous deep coral color I had ordered for Gaby. She is a size 34 (xs), but there weren't any available in her size and that color, so I ordered a size 36 (s). Unfortunately, the jacket was ENORMOUS, very large at the breasts and with too long and wide sleeves.


It was too big on me too, and I am definitely a 36. I was ready to return it the next day (no problem with that), but it gnawed me, because Gaby does need a spring jacket, now, on the one hand, and there was definitely potential in the design, the workmanship was immaculate and the fabric and color - great.
(The color is really deep coral and not tomato red, as seen on my computer screen).


So, while I lay in bed and thought about returning the jacket it occurred to me, that the construction of the sleeves actually allowed  a fairly easy repair, which would solve all the problems with the fitting. Taking the seam of the sleeves and the side seam of the body 2.5 cm in would raise the too deep armholes by an inch, narrow each sleeve by two inches and narrow the body by 4 inches - perfect.
I found a thread in the exact color, unpicked the lining and  got to work. I cut and resew the fabric and the lining, shortened the sleeves by 7 cm and reassembled everything back as neatly as I could.


It might seem a very trivial repair, but I am very happy with it,
patting myself on the shoulder :)))
Have you ever repaired brand new ready-made clothes?


Saturday, March 23, 2013

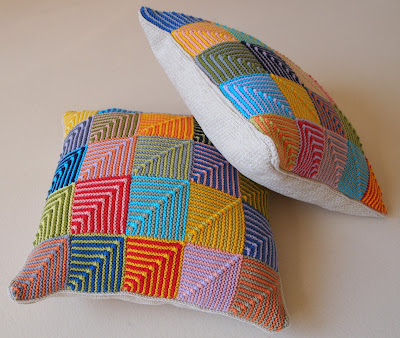
Mitered Square Cushions


Finally!, I finished my mitered square cushions yesterday night. The knitting of the squares, which I made entrelac, was fun and easy, though it took me several months according to my Ravelry notes :)))
The inside cushions are also home-made - I could have bought ready made in the right dimensions, but where's the fun in that :)))


The cushions are 40 cm by 40 cm, a total of 25 squares each. I knitted a border of two rows of stockinette stitch in the color of the back side. Initially I planned to sew the border to the back side, but I actually liked them bordered, so I crocheted an additional row of single crochet (sc) as the real edge of the knitted square.


The back side is upholstery fabric, similar to the upholstery of our sofas. 
The zipper is placed at the bottom of the cushion:


Probably it's beginner's luck - I had never before sewn knitting with my sewing machine and was quite worried. But the first cushion came out perfect from the first try. Encouraged, I thought the second would be easier and even tried some improvements. As a result it took me at least thrice the time and effort and the improvements proved to be for the worse. The moral: try to avoid making things in pairs!

Thursday, March 21, 2013

Bedding


Last night I made a new set of bedding for my girl's bed. There's such an extended choice of bedding fabrics for big or small girls - plenty of flowers, hearts, balloons and bright colors. And although, being a Libra, choosing is never easy for me, I picked this colorful cotton fabric without much hesitation.


The bedding consists of a flat sheet, a duvet cover and a pillow case. I know, not much of a seamstress achievement, but it still took me all late afternoon and evening to finish planning, cutting the fabric and sewing the seams. I made all seams covered (closed?), using as reference my old book on sewing - I had to search really long for it, for I hadn't used it in years :)))


Now I'll have to find matching fabric for my boy. I talked to him about choosing it together, but in the end he just told me that he didn't actually care that much about the color of his bedding, I could buy the same fabric as for his sister, if that would be easier for me.
And you know what, I just might do that!


Friday, March 15, 2013

Spring Knitting


Although only last week I added a sweater-worth of pure wool yarn to my stash for a new cardigan, I don't feel like knitting winter sweaters or accessories any more.
I want spring, I feel like knitting cotton and bamboo and linen in lightweight lace clothes.
So - I resumed my blue cotton cardigan, which I cast on almost a year ago in June. The pattern is a free Japanese design by Pierrot. When I started this project there was only a Japanese version, but now Ravelry has a link to an English translation of the pattern too.
Because I seem to be the first person on Ravelry knitting this pattern, I decided to provide a detailed description of my modifications:
1) The pattern is a beautifully structured combination of lace and cables. However, I found that a purl stitch between the k3tog lace columns gives better structure and look to the knitting. So I've inserted a purl stitch where the red line is:
2) I also added a picot edging to my cast on stitches. It follows the basic principle of picot edging: cast on 5 sts, cast off 2, cast on 5 st, etc. Only, instead of cable cast on, which produces nice even triangle picots (which to me are kind of old-fashioned), I improvised a different cast on method, resulting in these little irregular knots. Just a peculiarity of mine, I have a thing for asymmetry and irregularity :)


3) I made the cardigan seamless, knitting together the two fronts, the back and the 6 sts button bands. And I also added some waist shaping in the side cables:


4) I left the back neckline stitches live instead of cast them off and then pick up stitches. However, to account for the different width of the cables, every 6 sts cable is treated as four stitches:


5) The front neckline is raised (about an inch or an inch and a half). The buttonholes are single stitch holes every 20 rows:


6) The sleeves are 3/4 in length and completely different from the description in the pattern.
I measured the desired width, increase and length and in stitches and rows it translated as follows:
cast on 67 sts, knit the garter stitch picot edging, begin pattern and increase 1 st on every side every 14th row to get 79 sts and 100 rows.
The sleeve cap is long 46 rows and the decreases are as follows:
BO 4 sts
2-2-1
2-1-4 (This reads "Decrease every 2nd row 1 stitch 4 times")
4-1-3
6-1-2
4-1-1
2-1-2
1-1-3
BO 27 sts.
Remember to treat 6-sts-cables as 4 sts - this means that when decreases are made within cables twice two sts are decreased and are treated as only one stitch decreased.


My yarn is Madame Tricot Camilla 100% mercerized Egyptian cotton (100 g = 250 m) and I'm knitting it on 3 mm (US 2 1/2) needles. I find ropy silk-shiny mercerized cotton just the perfect yarn for such heavily textured summer cardigans, so far I'm very pleased with my process. I'm aiming at an xs size for my daughter, with a total of 210 stitches cast on  for the body (11 cables).
As of now I've finished the body and one sleeve, so expect a FO photo session next week :)

Monday, March 4, 2013

Pencil Box and Tablecloth


Doesn't that sound like the title of a fairytale :) Actually it all began a bit like in the old tale about the button that lead to buying a matching coat :))) I wanted to make a fully lined project box but I didn't have a suitable fabric. So, instead of buying the fabric for the box, I decided to buy enough for a tablecloth and make a box out of the remnants.


I was browsing through various tutorials, when my daughter saw the cute boxes and asked me to make her one for her pencils. Cotton is a fairly weаk fabric for a pencil box, so it occurred to me to make the outer box out of a pair of her old jeans and use the tablecloth fabric as the lining:


I followed the instruction of this tutorial, applying fusible interfacing only to the lining.
To make it more interesting and girly (and much more difficult for me) I cut out a heart from the fabric and embroidered it carefully on one side of the box, and on the other I stitched a beaded butterfly:


The red zipper was her suggestion - bull's eye idea!