Showing posts with label lining. Show all posts

Thursday, December 19, 2024

The Gold Dress

And here's the dress I sewed for Gaby's graduation - sheath dress out of intricate jacquard fabric, integrating black cotton, golden color threads and black velvety patterns. Taking pictures of it under the bright sun is a bit tricky, as it is quite chameleonic in nature and changes its outlook, depending on the angle of the sun rays, falling on it.

The pattern is the same sheath dress from the Burda autumn-winter 2015-2016 catalogue in petite size - such a joy to be able to sew without constantly making changes to adjust for the height.

The sewing of the dress went quite smoothly, I took into account all the small issues I had noticed with my first dress out of this pattern. The fact, that the fabric is kind of striped and pretty stiff also made the cutting and the sewing a piece of cake.

Pattern: Burda #6890 dress
Size: 17 Height: 154 - 160 cm
Fabric: cotton jacquard, polyester lining
Time to make: 10 days

My only small issue is with the width of the sleeves - it seams to me they could be a little tighter to fit the overall outlook of the dress. At least this is what i plan for my next make out of this pattern, when the time comes.

I think this will be the last dress for 2024, but can you believe it - I've made eight dresses this year. It seams every year there is a hidden theme in my sewing and this year dresses is definitely the name of the game :)


Sunday, November 17, 2024

Green Dress with Heartshaped Neckline

This is my year of dresses and I've made another one :) The pattern is much more involved than the previous sheath dress, with princess seams at the front, a hidden zipper, cut waistline and it also includes sleeves.

My fabric is a type of georgette and the lining is green colored polyester lining. The original dress is designed with a full circle skirt, but I opted for a semi-circle - neither did I have so much fabric, nor was I willing for so much volume.

My major modification was to transform the original front, which featured two separate fronts with real buttons into a single piece, only imitating a buttoned front. The major reason, apart from saving on labour, was that the original neckline was gaping on me and I had to take in some 3 cm in total from the volume. Of course, I could have opted for a solid front without any seams and if I am using more colorful fabrics for my next dress out of this pattern, that is what I plan to do, but the solid color of my fabric prompted me to add some interest to it in the form of the button band.  


  I also made my usual height modifications, which are one of the major reasons I rarely shop ready-to-wear dresses - my bust line and waist line need adjusting for my short stature. I took 0.8 cm of the height above the arm-openings and further 1 cm above waist. Next time I'll raise the waist just a tiny bit more, 0.5 - 0.7 cm would be a better fit, I think, especially if I decide to reduce the size from 36 closer to my 34.

Pattern: Burda #144 11 / 2016
Size: 36, reduced
Fabric: green georgette, polyester lining
Time to make: 1 week

The original pattern in the magazine does not include a pattern of the skirt, only instructions how to construct a full circle skirt, which is fairly simple and everybody knows, theoretically. It does not preclude the fact, that it is additional work, so I used my already cut and printed Vikisews Deniz skirt pattern, which I've been adding lately to most of my dresses.

The dress is lined - the body and the skirt are replicated out of polyester lining fabric.I did not see the point of adding volume to the sleeves, so they are left not lined. The lining of the skirt is also a semi circle skirt, but 10 cm shorter than the shell skirt.

The back closes with an invisible zipper and a hook and eye. I think I like the additional closure the hook and eye provides, however next time I think will go back to placing the invisible zipper right on edge of the neckline and skipping the clasp.


Thursday, November 7, 2024

Sheath Burda Dress

My latest dress, a sheath dress based on a pattern I've had for years and finally tried.

I've had several attempts at sewing sheath dresses and found them very unflattering on me, so I was under the impression that the type of dress just wasn't my thing. However, this pattern completely changed my mind - I love it and i am definitely going to repeat it, with very minor mods again, most probably with sleeves.

The piece of fabric I used for the dress, was a gorgeous purple georgette, a small 80 cm remnant. It was completely insufficient for a dress, I had bought it just because I loved the color and the fabric, with the idea that I should be able to make something out of it, whatever, anything.

And then I printed the dress pattern and began thinking of some fabric to make a test garment. I took out this piece, saw that it was too short and put it back in my stash. But after some deliberation, I decided that I wasn't going to waste my efforts on unwearable tests and would try to make a short dress.

Once I had finished the dress, I found that it was too short for my taste, but luckily I had a piece of fabric left, from which I could cut strips to attach to the front and the two back pieces. I bought some decorative ribbon and covered the seam of attachment with the ribbon, and then added a second ribbon, just for balance. I like it with these ribbons and I think they actually look organic on the dress.

Things I would change next time - I could take just a tiny bit from the neckline at the back, not more than a centimeter from each side. I would also make the dress 2-3 cm longer and would move the front darts 0.5 cm towards the center of the dress. The main fabric is comfortable, but the lining is a bit stiff and probably needs just a bit of additional width - some 2 cm at the hip area wouldn't hurt.

Pattern: Burda #6890 dress
Size: 17 Height: 154 - 160 cm
Fabric: purple georgette, polyester lining
Time to make: 3 weeks


Saturday, February 18, 2023

Men's Lined Hoodie

I made a new hoodie for my husband. The pattern is very similar to that of my own hoodie out of the same fabric - front zipper, big three-part hood, split kangaroo pockets, fully lined.


The outer fabric is a double knit in large houndstooth design in black and grey. I was gifted this fabric a couple of years ago and after I made my hoodie, which is a staple in my hiking wardrobe, I've been contemplating a similar one for husband as well. Recently, after making him a Burda longsleeve out of a nice viscose knit, I noticed that my pattern contained actually two versions - the one I made and a second version with a hood and a kangaroo pocket. And the hood was exactly the style I was looking for - with raised neckline and a central insertion.

The original pattern is actually a blouse, but there's nothing easier than adding a zipper in the center and turning a blouse into a zippered anorak. Because my outer fabric was kind of thin and prone to sticking to other fabrics, I opted for a full lining again. I've been into high quality heavy viscose knits lately, so we chose this gorgeous bright orange viscose to liven up and complement the dark color of the outer fabric.

As far as sizing - my husband is size 48 according to Burda size tables, and the long-sleeve from this pattern in size 48 fits him perfectly. For the hoodie I went a size and a half up - that is I chose size 50, but added additionally a bit of width to the body, to take into account, that this is a lined hoodie, to be worn over other blouses.


Size: 50 with with added length
Fabric: double knit; cotton viscose knit; rib knit
Time to make: two weeks

The hood is deep and wide enough, without being too roomy, I think it has a good balance.

The pockets are also deep and lined as well. I added rib knit at the pocket openings for stability. 

I also tried to do pattern matching, where possible, without being too obsessive.

We still haven't worn our similar hoodies in the mountains, I wonder how it would feel - cute or ridiculous :)


Monday, December 6, 2021

Slow Sewing

I love sewing with knits - the fit is forgiving, the sewing is quick and they usually get a lot of love and wear. But from time to time I like to make something with a difficult fabric, complicated pattern or couture techniques, even when all the labour goes into an item that gets little wear.

Such a labour consuming item is my latest make - a short button-up skirt out of wide rib corduroy. This is my first time working with such a fabric and it's a struggle! Because of its thickness, it acts as a 3D fabric and I have to baste everything tightly with wide zig-zag baste hand stitches, otherwise pieces move in all directions, especially when stitching the flimsy lining fabric to the corduroy.

And then the pilling - I must have dusted the bedroom / sewing room a thousand times since I cut into the fabric, as it constantly drops small fluffs everywhere. For that reason I decided to finish all seams with Hong Kong seam binding with bias tape. I have a big piece of viscose fabric from a purple shirt I made for myself some time ago and it was a perfect match for the main fabric.

The only two edges I hurried to finish on the overlocker were the waistline of the skirt and the outer edge of the waistband, for fear of fraying during the long process of sewing.

The additional elements of the skirt - the pockets and the belt tabs, are fully lined. I still haven't decided on the fastening - the pattern suggests snaps, but I don't have the hardware for installing large snaps and I am not very keen on looking for a service that could do it for me, so I think it will be buttons. I fancy the idea of brass jeans buttons and if I can't find suitable downtown I might sew temporarily some plain plastic ones and order brass buttons on Aliexpress or ebay.

And of course, the skirt is fully lined. 

I'm really taking my time with this skirt, slowly and carefully sewing an element or two. After I took these pictures, I attached the front pockets and the lining to the two fronts and I think I'll take a break for today and do some knitting and watch another episode of Vienna Blood. With me and my hobbies it is really all about the process, not so much the product.


Friday, November 10, 2017

Striped Jeans Bag


I sewed a new bag out of old jeans, inspired by a picture on Pinterest. The bag is lined, with recessed zipper, adjustable strap and one inner pocket.

For the back I preserved the seam of the jeans, an old pair of Alex's, which he outgrew quite fast, so it was barely worn out.

The recessed zipper gave me quite a headache, until I found an youtube tutorial and figured it out.

The lining of the bag has reinforced denim bottom:

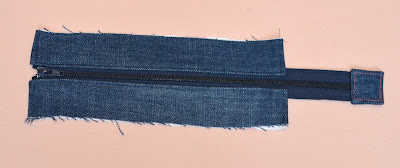
Some process pictures - the zipper (I replaced later the tab on the zipper with a smaller and more unobtrusive one)

One piece of the lining with the bottom and the pocket

The inner part of the bag:
The bag flat:
The beauty part:

Thursday, June 15, 2017

Jeans Bag with Knitted Front


Last summer I got the idea to make a small crossover jeans bag with a knitted front. I had some cotton-linen yarn left from Gaby's Freya cardigan and I knitted in into a rectangular panel. The initial idea was for two panels, as wide as the bag, but one shorter in height, so that the jeans panel under it would show partially on the front. However the yarn turned insufficient for two panels and then when I reached the desired size of the knitting, it was not symmetrical to the pattern, so I continued knitting until I had two full repeats of the pattern. But this made the panel too high for my initial idea, in hindsight I should have stuck to my plan, regardless of the asymmetry. Now the knitted panel looks unnatural on the bag, like a patch. The good news is that the stitches could be unpicked and the patch removed and with a couple of decorative pockets the bag would be a regular jeans bag. And this is probably what I'll do after a while.


The jeans textile is recycled from Alex's old jeans and the inside of the bag is made of strong cotton textile.


The bag is closed with a recessed zipper. The lining has one big pocket.

The handle is long and adjustable.

The bag is very light, but big enough for a wallet, phone, keys and my old Kindle, so it's all I need for the summer.

A quick shot of me and the bag fresh out of the sewing machine in the local supermarket.